DIY Cedar Planter Box with Wood Slats

There’s something incredibly satisfying about building something beautiful and functional with your own two hands—especially when it enhances your outdoor space. In this project, we’re making a rustic yet modern, durable cedar planter box using simple tools and materials. Whether you’re growing herbs, flowers, or just looking to elevate your porch or patio décor, this planter is a great weekend build.
Let’s dive in!
🛒 Shopping List
(2) 2x2" x 8ft Treated Pine Boards or Cedar Boards
(1) 1x3" Cedar Board (or Furring Strip) - I couldn’t find any in stock at my store so I used my table saw to rip down the 1x6” cedar board that I bought for the shelves
1.5" Wood Screws
1" Brad Nails
Brad Nailer - You can use an 18 gauge or a 20 gauge
✂️ Cut List
Start by making the following cuts:
(6) Cedar Fence Pickets @ 19"
(6) Cedar Fence Pickets @ 18"
(4) 1x2 @ 18.5"
(4) 1x3 @ 18.5"
The rest of the cuts—especially the 1x2" slats—will be done as needed while you build.
🛠️ Step-by-Step Instructions
Step 1: Cut Everything First
Before you start assembling, go ahead and make all your initial cuts. It saves time and helps you stay focused during the build.
Step 2: Build the Corner Legs
Each corner of the planter box is made by attaching a 1x2" to a 1x3". These form the "legs" of the planter and provide the structure you’ll build the sides around.
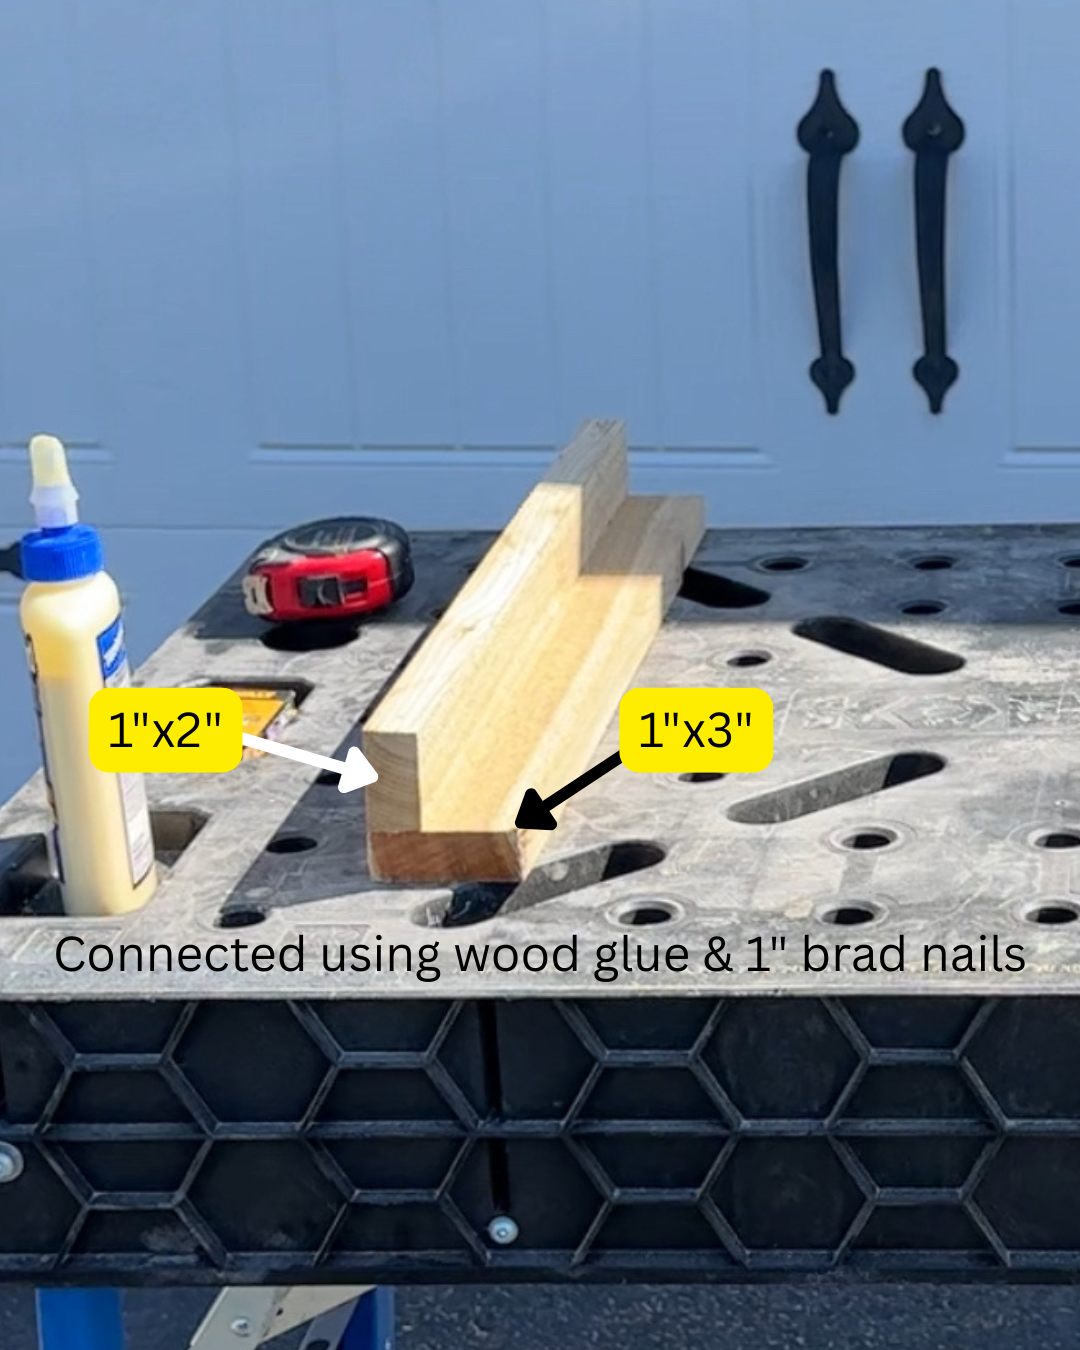
Apply wood glue to the edge of the 1x2"
Line it up with the 1x3"
Secure with 1" or 2” brad nails (depending on which side you nail in)
Repeat until you have all four corners built.
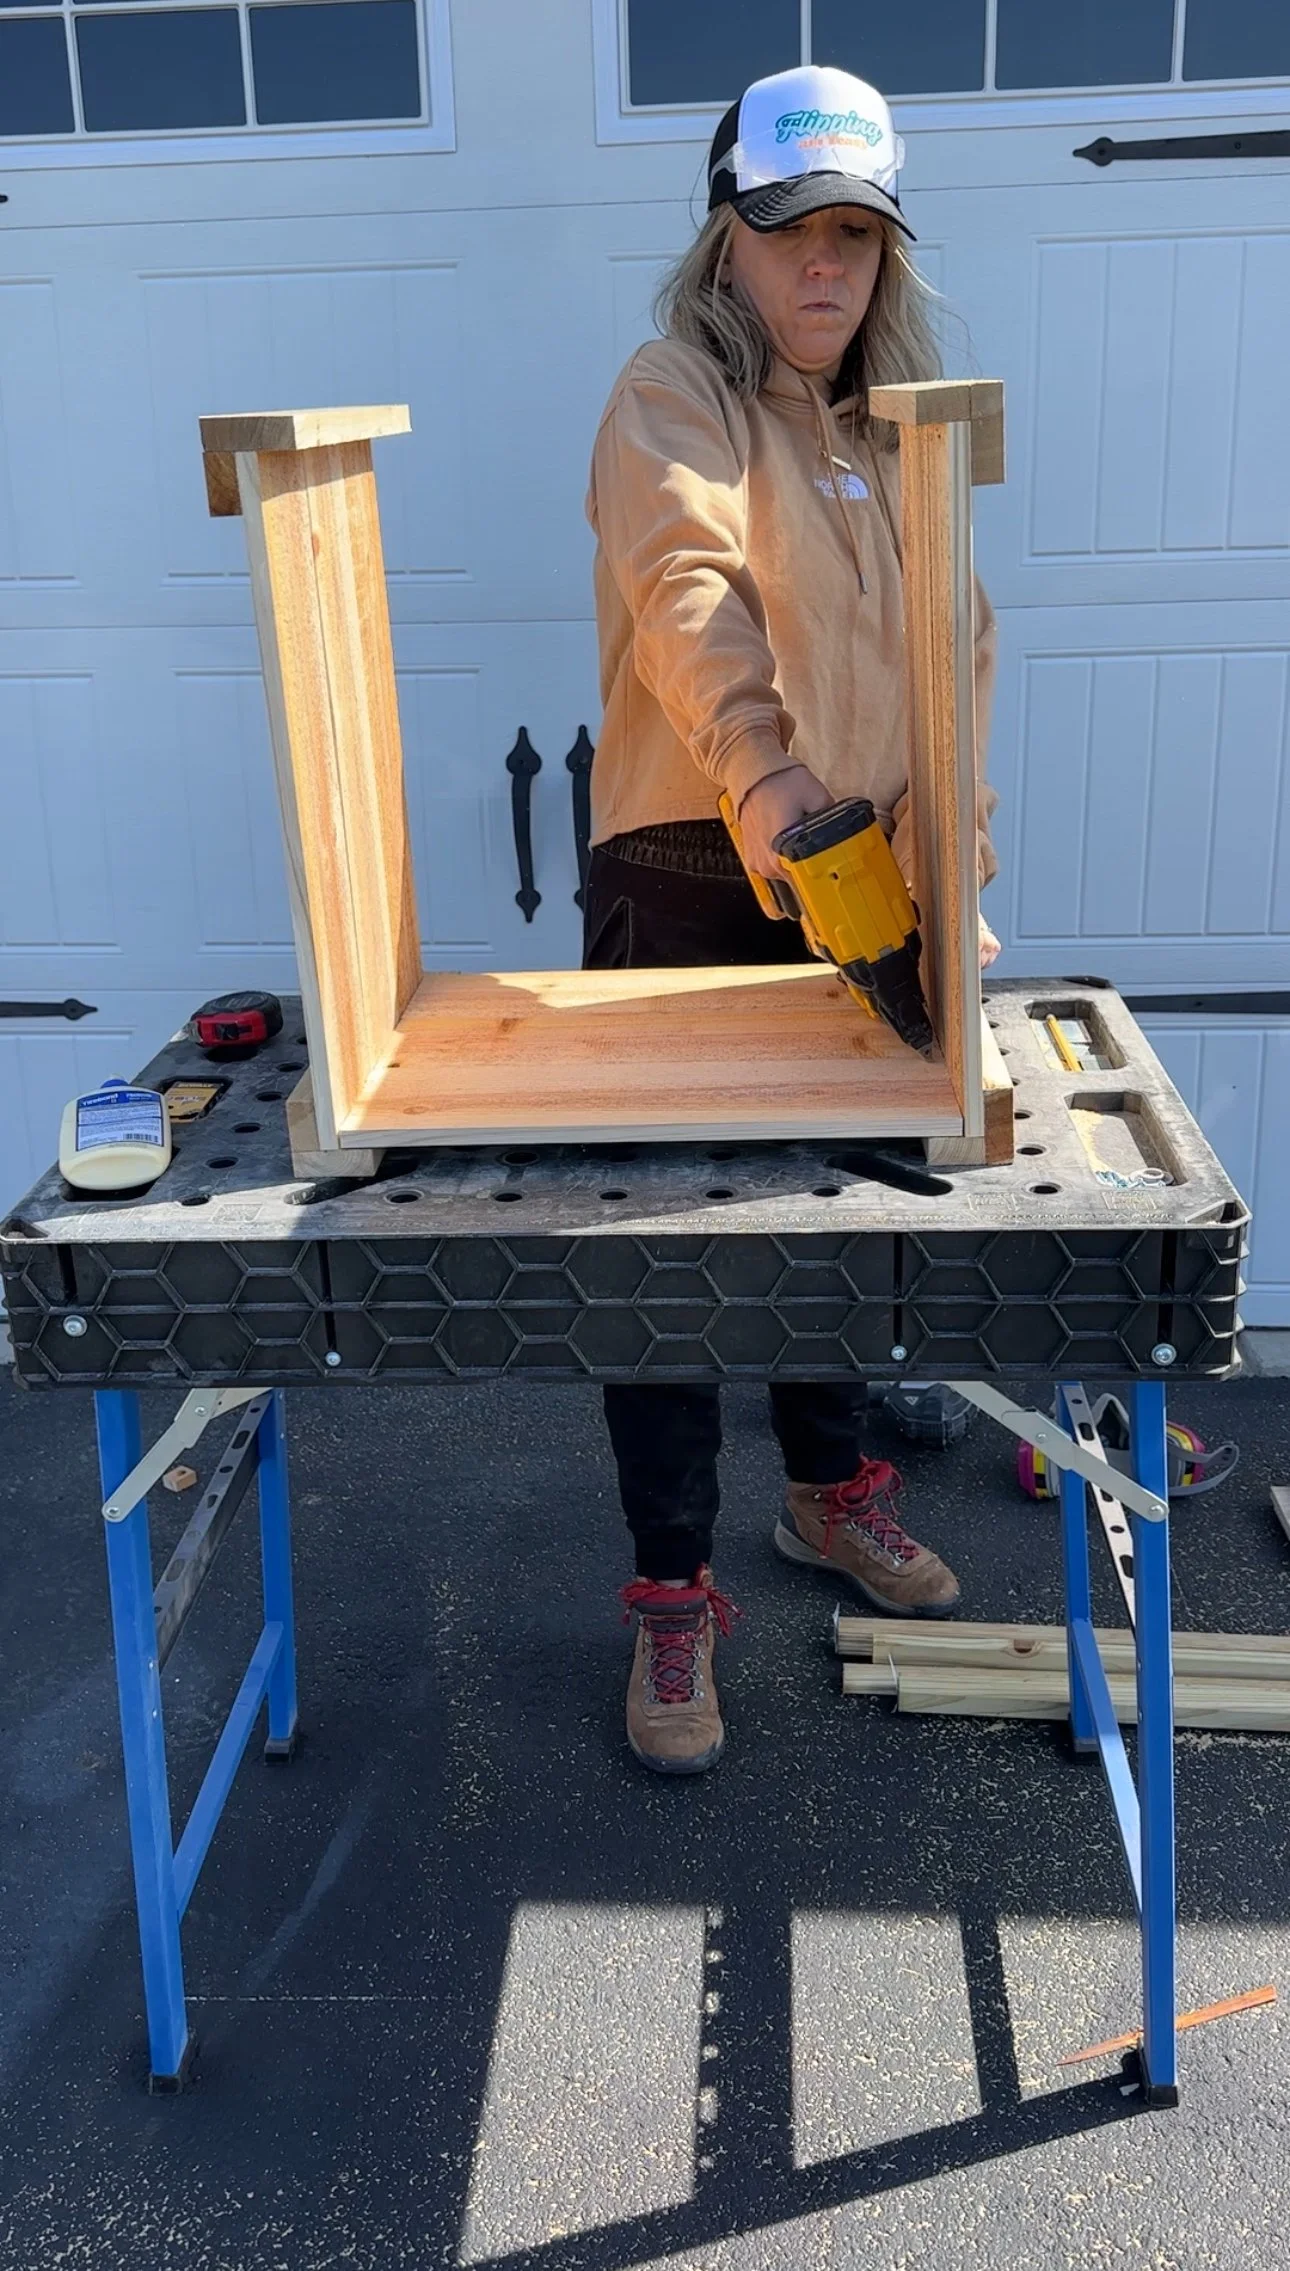
Step 3: Assemble the Side Panels

Now that you have your corners ready, you’ll start attaching the cedar pickets to form the four sides of your planter.
Take (3) 19" or 18" cedar pickets
Attach them horizontally between two of your corner legs using wood glue and brad nails
This will create a full side of the box. Repeat until you have all four sides assembled.
Step 4: Create a Base for the Planter
You’ll want something to support the dirt or an inner pot—this is where your scrap wood comes in handy.
Choose a height for the "false bottom" (I chose about 12" down from the top)
Attach scrap wood pieces inside on 2 opposite sides
Create a platform across the bottom using more scrap wood to hold the weight of soil or a smaller pot. I used extra 1”x2” pieces that I had laying around.
Think of it like a wooden box spring that supports everything above it.

Step 5: Add the Top Trim
To finish the look, we’re adding a clean top trim using the 1x2" boards.
Cut 1x2s to fit the dimensions of your planter top (cut-to-fit based on your actual box)
Attach them using wood glue and brad nails for a neat, polished finish
This really elevates the look and hides any uneven edges.
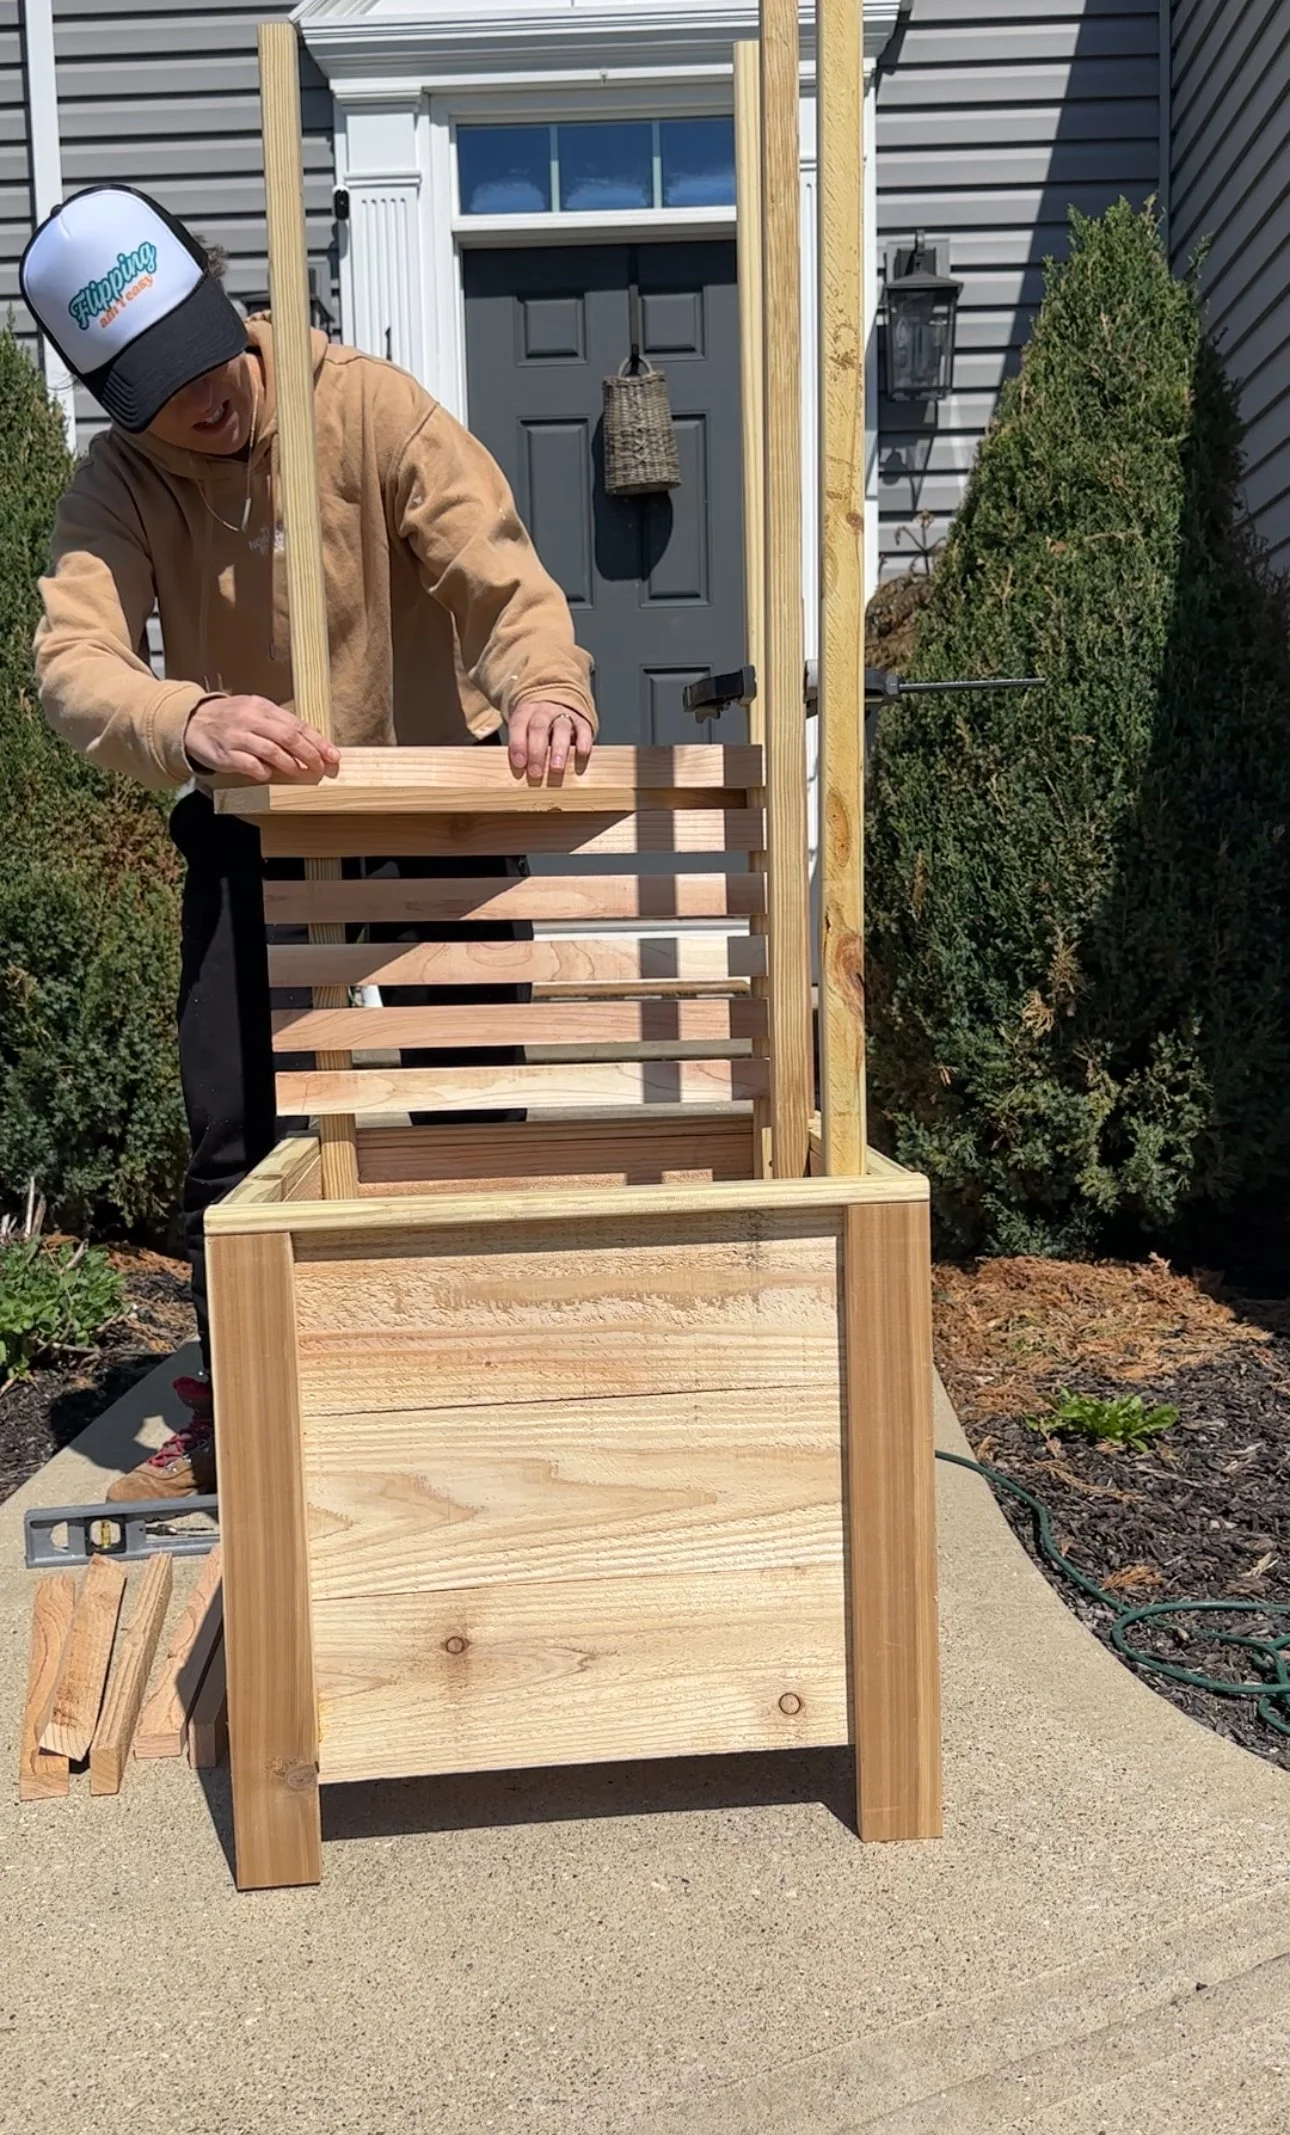
🌱 Optional: Add the Vertical Slats
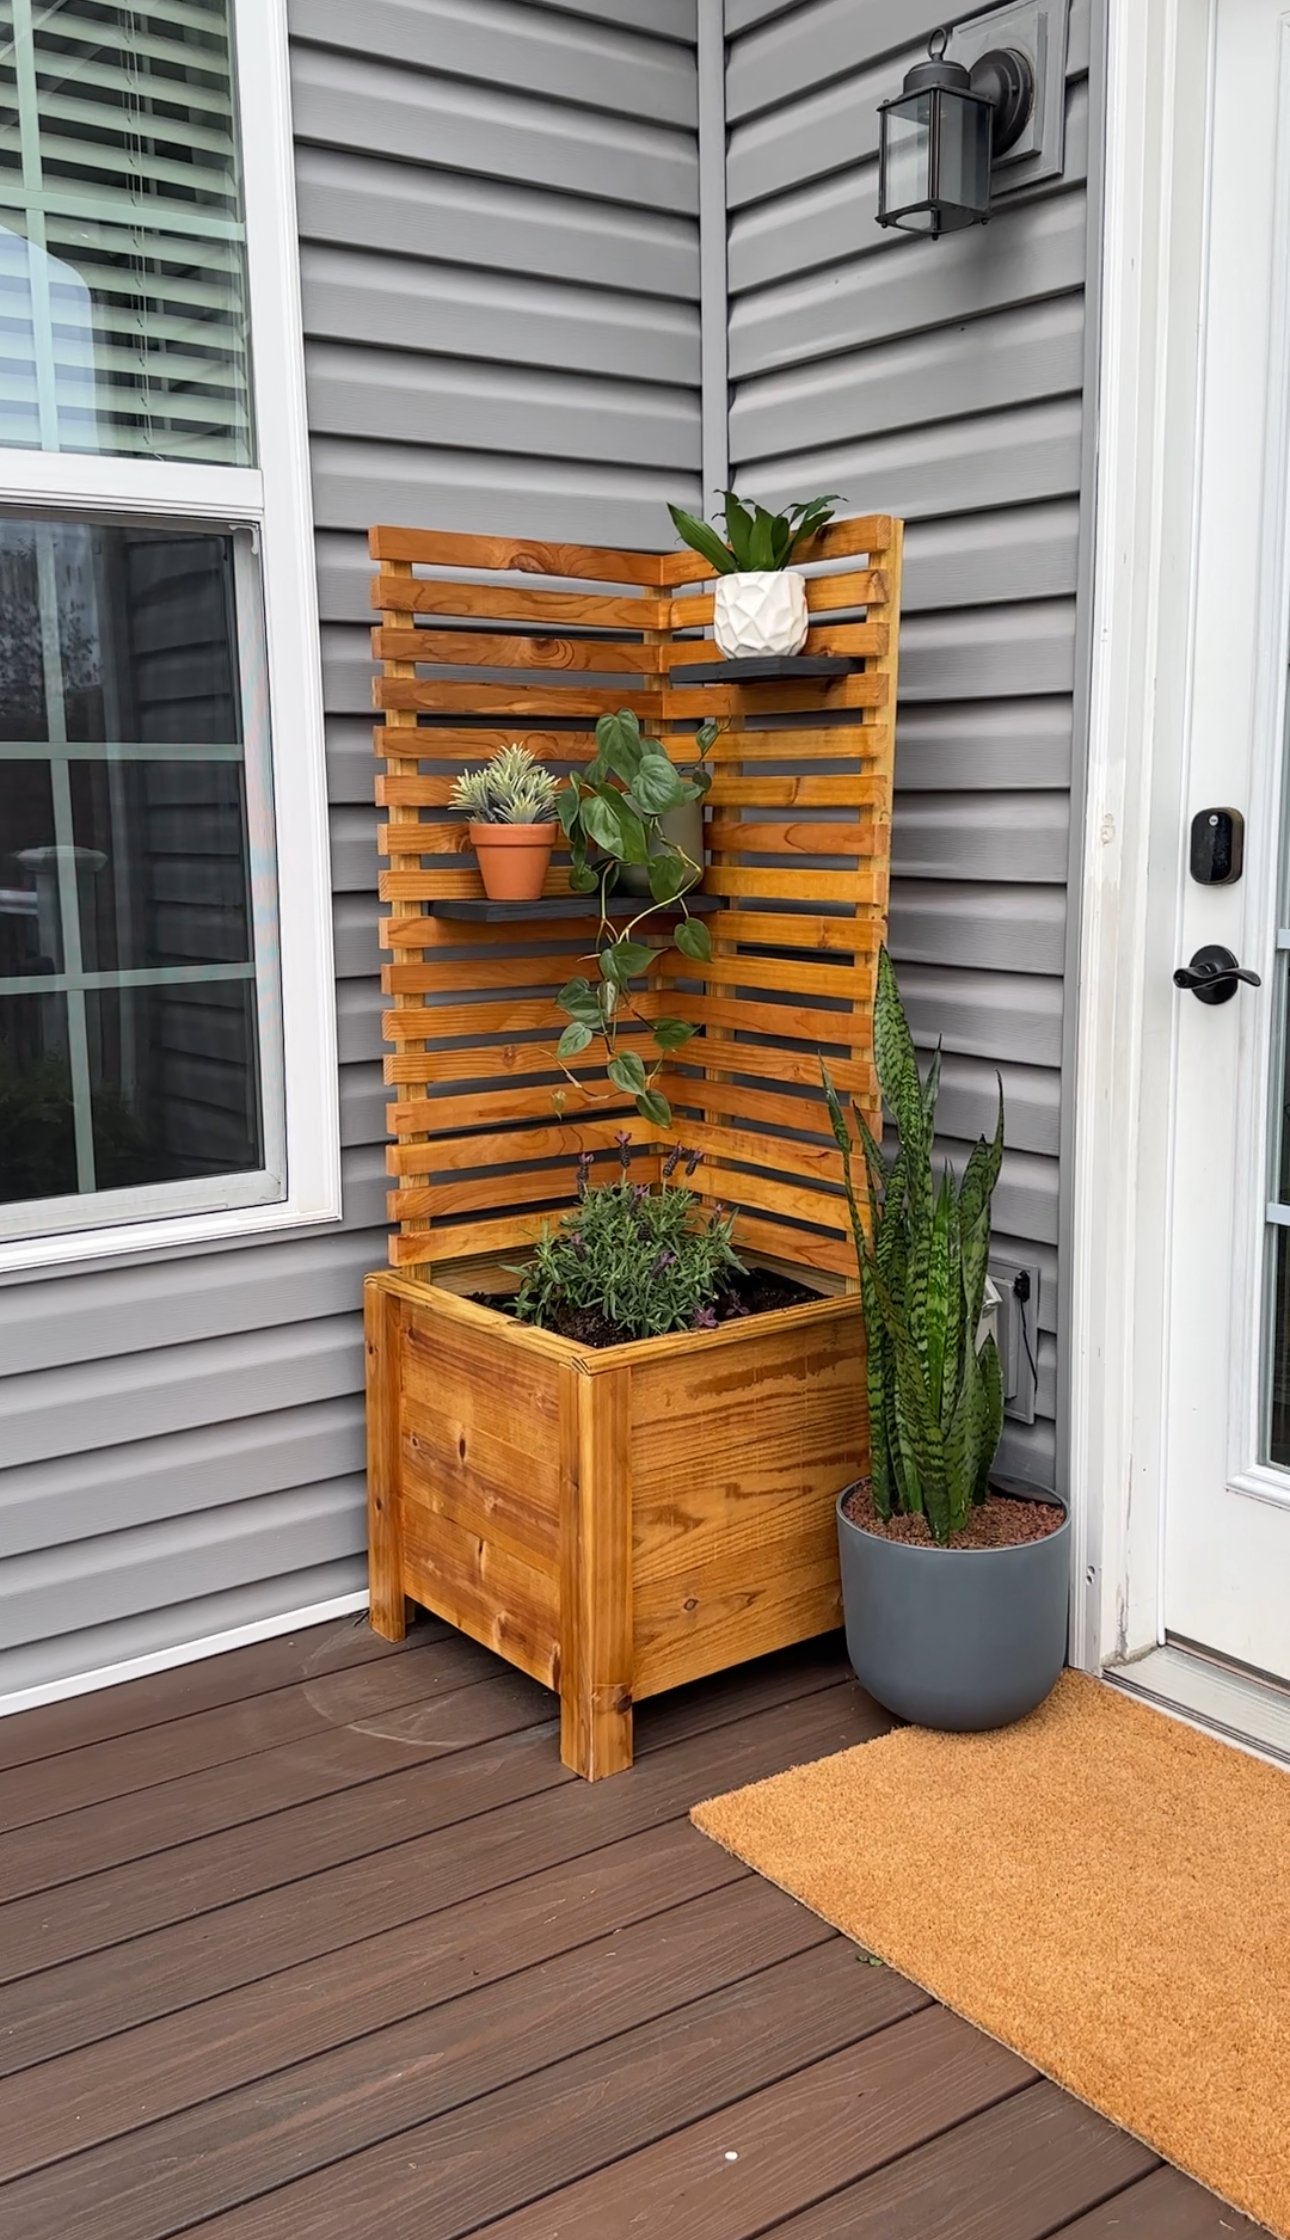
At this point, you’ve got a beautiful, functional cedar planter box. You could stop here—or you could take it up a notch by adding decorative slats to the top that also function as another place to store or hang plants!
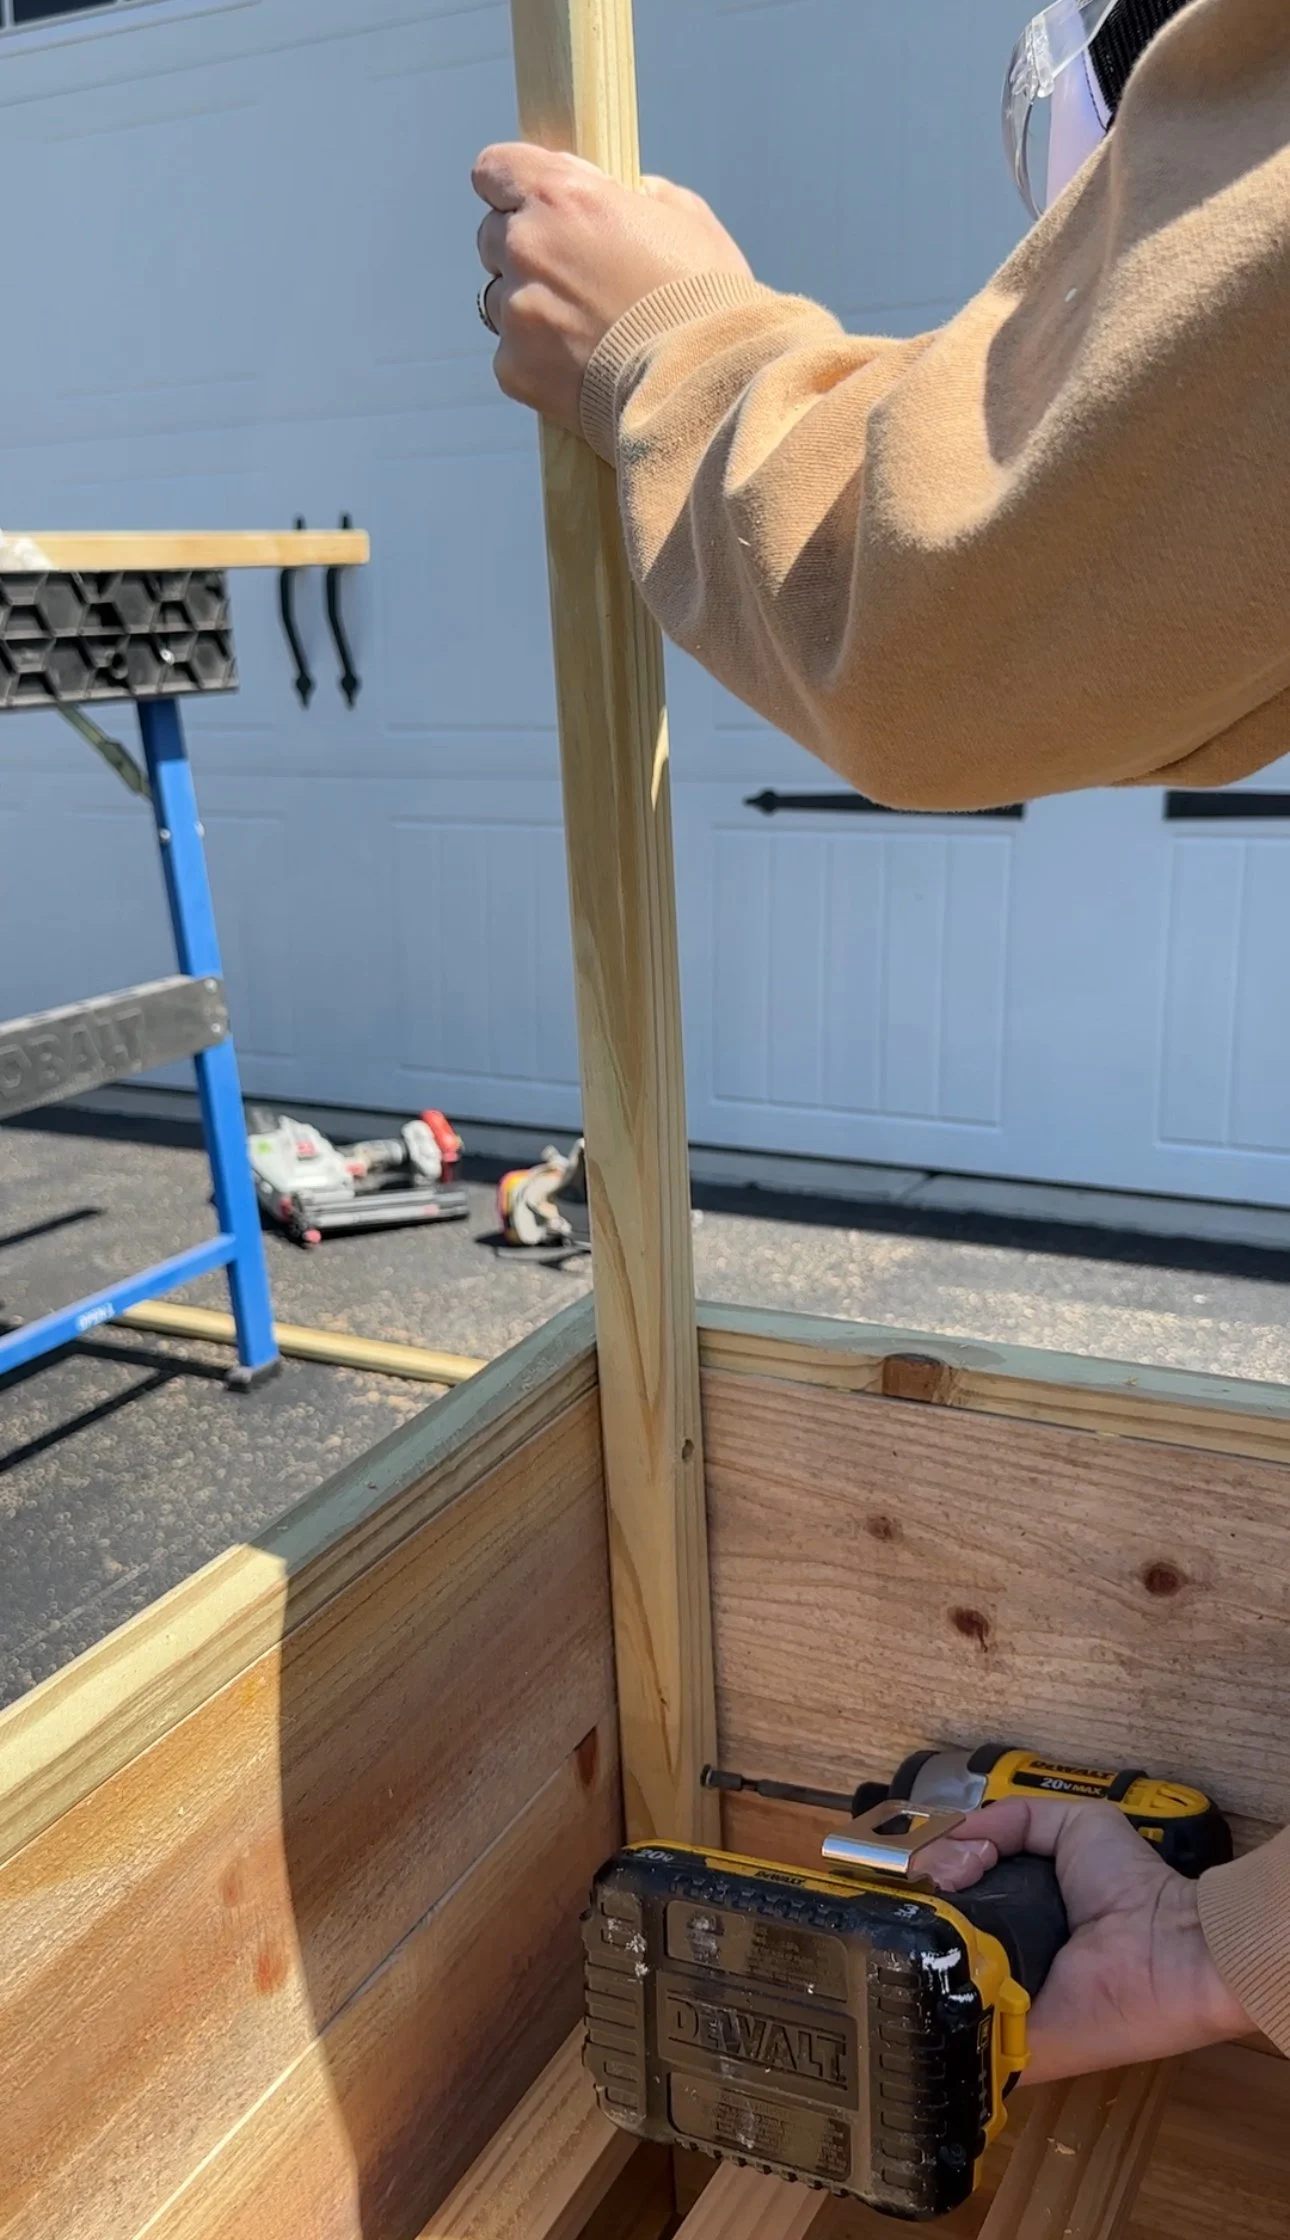
🪵 Step 1: Install the Vertical Support Posts
To support the vertical slats, I used the 2x2" treated pine boards from our original shopping list.
I cut four posts to my desired height, which ended up being around 3 feet 11 inches.
Three of them were attached to the three corner points of the planter.
The fourth was attached to the “middle corner”—that way, every side of the planter had slats secured into two vertical supports.
🔧 Pro Tip:
Pre-drill pilot holes before driving in screws to avoid splitting the wood!


📐 Step 2: Cut & Attach the Slats
Time to give your planter that custom look with vertical 1x2” cedar slats.
Here’s how I did it:
I started with one side of the planter first.
I used a spacer between each slat to keep the gaps consistent. (Tip: I used a shelf piece that matched the gap size I wanted!)
Once everything looked level and square, I:
Drilled a pilot hole at the back of each slat, on both sides
Screwed each one into the vertical 2x2" posts on either side
Then I moved to the next side, repeating the process to create a beautiful, continuous corner of slats. Since my planter was going into a corner of my porch, I only needed to cover two sides—but you could only put the slats on 1 side too.
🎨 Step 3: Stain It
For the finish, I used Cabot’s spray exterior stain in the color Honey Teak. It brought out the grain of the cedar beautifully and gave the planter a warm, natural tone.
Let it dry thoroughly before moving to the next step.
🌿 Step 4: Add Garden Fabric & Dirt
To help with drainage and keep dirt from falling through the base:
I stapled garden fabric across the inside of the planter bottom.
Then I added soil, leveled it out, and got ready to plant!

🪴 Step 5: Add Shelves & Style It!
After the stain dried, I added my wood shelves, popped in some of my favorite plants, and voilà — it was DONE.
Note: I used 1x6” cedar boards for the shelves and cut them at various sizes. I spray painted them black in a Rustoleum black spray paint. I skipped the sealing step of the shelves though so I need to do that ASAP to ensure the shelves last long.
This planter now lives happily in the corner of my porch, and I absolutely love how it turned out.


🌟 Final Thoughts
This project is proof that with a few basic tools and materials, you can create something totally custom and full of character. The cedar smells amazing, the slats give it a designer edge, and it’s sturdy enough to last for years.
Make sure to follow me on my social channels and share a picture if you make this!