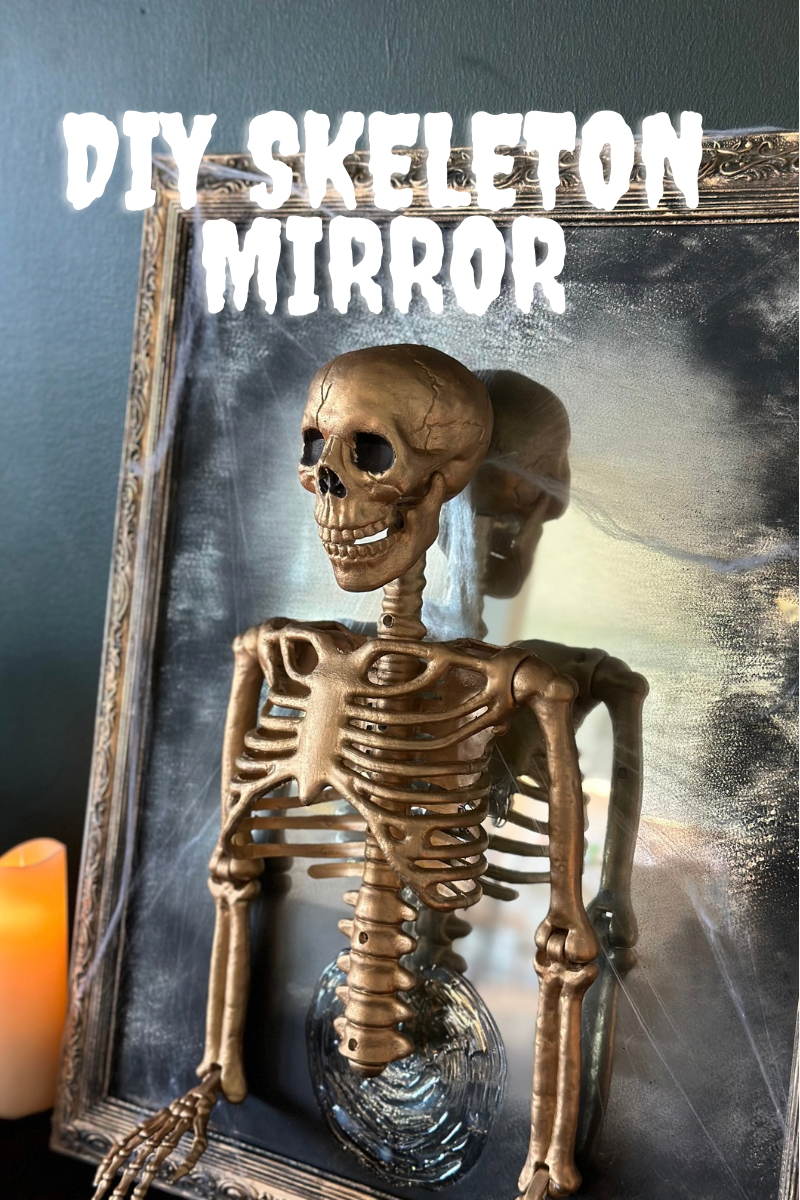
DIY Skeleton Mirror: A Spooky-Fun Project!
Ready to get a little spooky with your home décor? This DIY Skeleton Mirror is not only perfect for Halloween, but it’s also a fun way to add a touch of eerie elegance to your space year-round! Plus, it’s affordable and super simple to make. I spent a total of $20 on it (using a skeleton I had lying around). Let’s dive into how I transformed an old thrift store mirror into a bone-chilling statement piece.
Items Needed:
Mirror (thrifted, upcycled, or one you already have)
Full-Size Skeleton (not the one I have but any 3ft skeleton will work)
Screwdriver (for disassembling the skeleton)
Rub 'n Buff (I used Antique Gold, but any color works)
3M Hooks (for easy attachment without drilling)
Optional: Gallery Series Glass Paint (for that extra “coming through the mirror” effect)
Step 1: Grab a Mirror

I started by hunting down a mirror at my favorite thrift store.
It was listed for $10, but lucky for me, there was a sale, and I snagged it for just $5! If you’re working on a budget (who isn’t?), thrifting is a goldmine for this project. Don’t stress about finding the perfect mirror—imperfections add character!
Step 2: Age the Mirror
Age a mirror using no chemicals - just some water and spray paint!
Now for the fun part—aging the mirror! There are a ton of ways to do this, but my go-to is quick and easy: water + black matte spray paint. Here’s the trick:
Grab a spray bottle and fill it with water.
Lightly spritz around the edges of the mirror (or wherever you want that "aged" look).
Spray a coat of black matte spray paint over the wet areas, then immediately blot with a lint-free cloth.
Repeat this process 2-3 times or until you get that perfect vintage vibe. It’s quick, easy, and makes your mirror look like it’s seen some things. 🕸️
Step 3: Grab a Skeleton
No skeletons in the closet here—we’re bringing them out front and center! I picked up a full-size skeleton and carefully disassembled it using a screwdriver. All I needed was the upper half (bye-bye legs and butt!). The best part is, you can totally customize the skeleton. Leave it in its original state or, like I did, give it a makeover.
I used Rub 'n Buff in Antique Gold to give my bony friend a glam, vintage vibe. Seriously, I’m obsessed with how this color turned out—it’s like haunted chic.
Step 4: Attach the Skeleton
Attach skeleton to mirror using 3M Command Hooks
Now that your skeleton is looking fabulous, it’s time to attach it to the mirror. I used trusty 3M hooks (because I’m all about no-drill solutions!) and placed them on the back of the skeleton’s rib cage. Make sure to position your skeleton so it looks like it's creeping out of the mirror!
Step 5: Optional - Glass Paint for Extra Spookiness

If you want to take your DIY Skeleton Mirror to the next level, here’s an optional step: use Gallery Series Glass Paint to create the illusion of the skeleton breaking through the glass. Full disclosure, though—this stuff takes forever to dry. I didn’t have the patience, but if you do, it adds an extra layer of spook-tastic detail.
Final Thoughts
This DIY Skeleton Mirror was such a fun project, and the best part? It’s totally customizable. You can go as spooky, chic, or glam as you like. Plus, it’s a great conversation piece for your next Halloween party (or just your everyday gothic-vibe décor).
If I did it again, I’d probably skip the glass paint because I’m all about quick results. But hey, if you’ve got the patience, go for it! Either way, this mirror is sure to add a touch of the unexpected to your home.
Happy crafting—and remember, keep it spooky! 👻💀
